A Developer's Guide to Agile Rollouts: adding Feature Flags in React
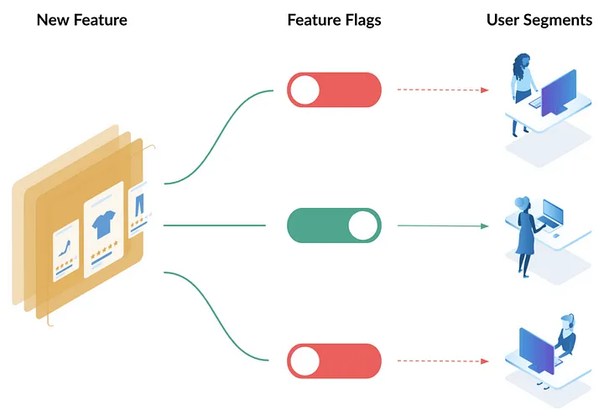
Feature flags, also known as feature toggles or feature switches, are a powerful tool in software development that allows developers to enable or disable specific features or functionalities in an application. In the dynamic landscape of front-end development, the integration of feature flags has emerged as an indispensable strategy, unlocking a realm of possibilities for developers seeking agility, flexibility, and enhanced control over their projects.
Using feature flags you can:
- Prevent long-lived branches and do Continuous Integration (Software Delivery Advantage)
- Test features for stability on production (Stability Advantage)
- Enable a set of features for beta users only (Implement Early Access)
- See if planned features get traction with user segments (Marketing Advantage)
- Lay the foundation for A/B tests and data-driven decision-making (Agile Organisation)

In this article, we'll explore how to implement feature flags in a React application, enabling developers to control feature activation dynamically.
Why Use Feature Flags?
Here are some benefits you get by adding feature flags to your project:
- Progressive Feature Rollouts: Feature flags enable progressive rollouts, allowing developers to release new features incrementally to a subset of users. This helps in identifying and addressing potential issues before a full release.
- Hotfixes and Rollbacks: Feature flags provide a safety net for deployments by allowing teams to quickly disable a feature if issues arise. This can prevent downtime and reduce the impact of bugs on users.
- Navigating environments: Navigating the complex terrain of varied environments, from development and testing to staging and production, can often pose challenges. Feature flags, however, provide a solution that transcends these hurdles by allowing developers to seamlessly toggle on or off specific features at runtime, independent of the deployment environment.
- Flexibility in Release Planning: Feature flags provide flexibility in release planning, allowing teams to decouple feature development from release schedules. Features can be completed and merged into the codebase but remain hidden until they are strategically released, providing a more adaptable and responsive development process.
Basic Implementation with React Feature Flags
To implement feature flags, we will be using react-feature-flags library.
1. Install the library:
1npm install --save react-feature-flags2. Wrap your App component into features provider:
1import { FlagsProvider } from 'react-feature-flags';
2
3ReactDOM.render(
4  <FlagsProvider value={flags}>
5    <App />
6  </FlagsProvider>,
7  document.getElementById('root')
8);
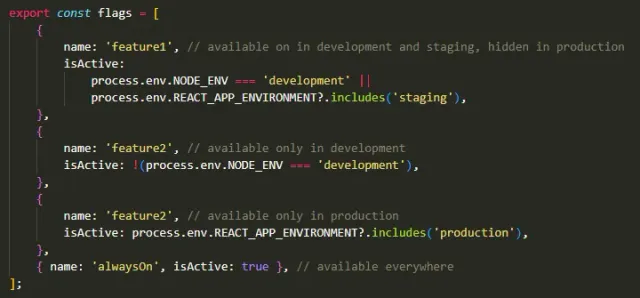
3. Configure flags value:
Here is an example of the features configuration for the project with 3 environments: development, staging & production).

4. Set the feature name for your component:
1<Flags authorizedFlags={['feature1']}>
2  <h1>This component should not be renderd on production</h1>
3</Flags>
And that`s it!
Conclusion
Implementing feature flags in a React application is a powerful strategy for managing and controlling features dynamically. Whether using a lightweight library like react-feature-flags or any other service, feature flags provide flexibility, reduce deployment risks, and empower teams to deliver better user experiences through controlled feature releases.

Optimize with ZEN's Expertise
Upgrade your development process or let ZEN craft a subsystem that sets the standard.
Read more:

A Developer's Guide to Agile Rollouts: adding Feature Flags in React
**Feature flags**, also known as **feature toggles** or **feature switches**, are a powerful tool in software developmen...

At least 30 WordPress plugins infected with malware; more sites are considering migration
In recent years, the security of WordPress has come under scrutiny due to several high-profile vulnerabilities and attac...

What’s wrong with GA4, or how to find essential reports in Google Analytics
Google Analytics 4 (GA4) reporting has received some criticism and feedback from users since its release. Despite GA4 of...

Remote Coding Job Interviews are DEAD because of Nvidia and ChatGPT
With the rise of remote work, remote coding job interviews have become increasingly popular. However, this shift has bro...

Add lightning fast search to your React/Nextjs site
Creating a search feature on your website can significantly improve the user experience. A well-designed search bar can ...

'The End of Programming' is silly sales nonsense
With the recent rise of Github’s CoPilot and ChatGPT you can see the technology for code generation is ‘hot’. (Side note...
